Overview
Confirmation Emails
Automated emails that fire when guests register, join the waitlist, decline, or update their information. Deliver calendar invites, confirm registrations, and keep the door open with non-attendees.
How Confirmation Emails Work
Section titled “How Confirmation Emails Work”Four email types cover the guest lifecycle. Find them under RSVP tool » Email Settings.
Each guest action triggers the right email automatically.
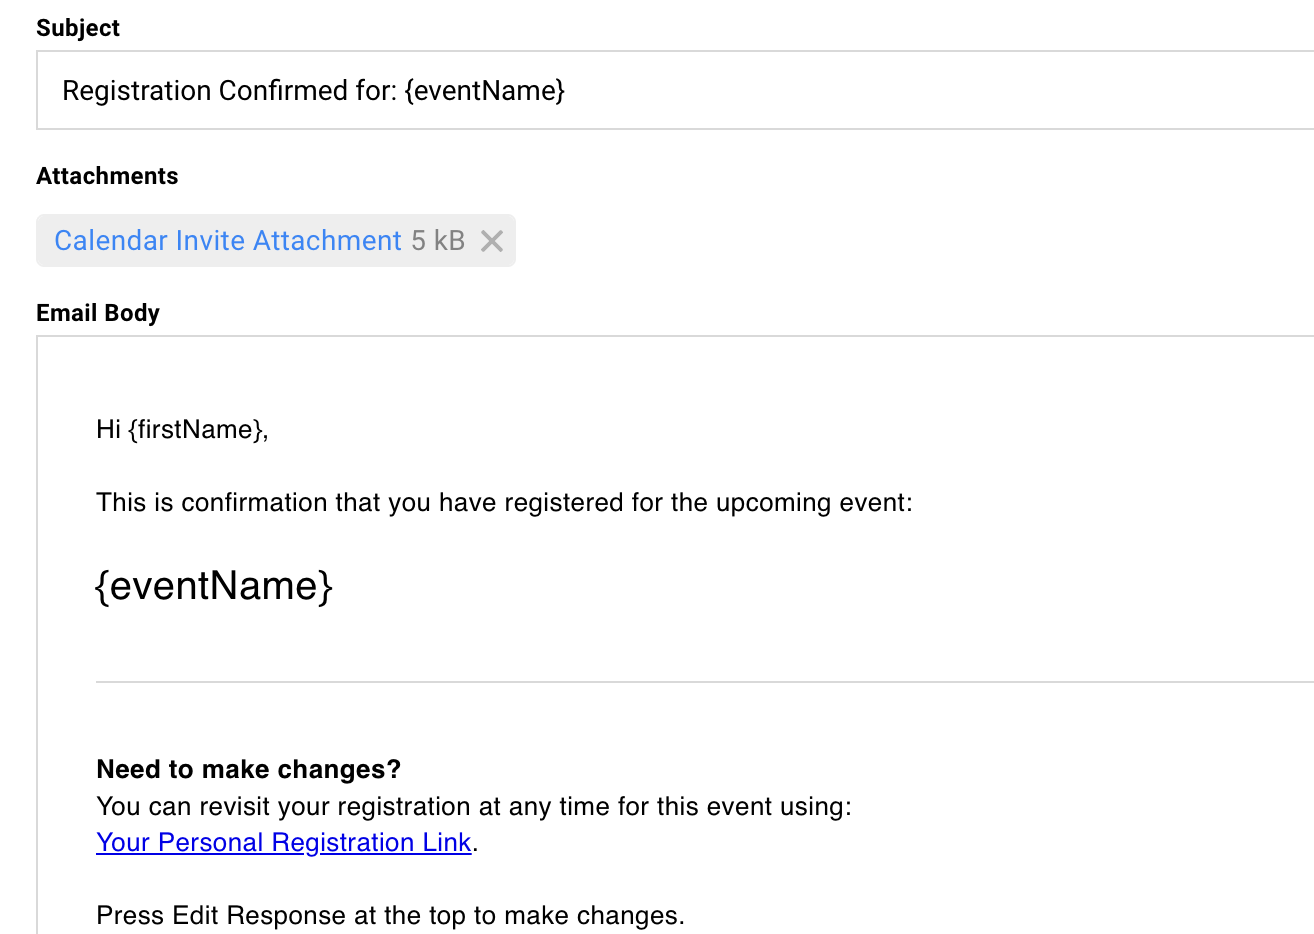
Acceptance Confirmation
Fires when a guest clicks Accept or Yes on your registration page.
The default includes their unique RSVP link and a calendar invite attachment. This is the primary mechanism for getting the event on their calendar.
Why it matters: Guests expect immediate confirmation. The calendar invite arrives while they’re still thinking about your event.
Waitlist Email
Fires when a guest joins the waitlist. This happens when registration is in waitlist mode or they use a public link with waitlist enabled.
No calendar invite attached. Signals that they are in the queue but not yet confirmed.
Why it matters: Acknowledges their registration without promising a spot.
Decline Email
Fires when a guest clicks Decline or No.
An opportunity to thank them, keep the relationship warm, and leave the door open for your next event. Optional to send.
Why it matters: A graceful decline email maintains the relationship.
Survey Update Email
Fires when a guest returns to their registration and changes information: dietary restrictions, session selections, or cancellation.
Confirms their updates were saved.
Why it matters: Guests know their changes went through. You avoid confusion at the event.
Understanding the Requirement
Section titled “Understanding the Requirement”Confirmation emails must use SendGrid sending accounts, not connected Google or Microsoft accounts. This ensures reliable delivery throughout your event lifecycle.
Why Not Gmail or Outlook?
Connected personal accounts require periodic re-authentication. If this happens during your event, automatic emails stop sending without warning.
SendGrid accounts stay connected permanently. No surprise outages. No missed confirmations.
Your Sender Options
Use a shared address like events@yourfirm.com for consistent branding across all events.
Or create a SendGrid sender that mimics a personal account (marcus@yourfirm.com) if you want confirmation emails to appear more personal.
Both work. Pick what fits your audience.
Make Sure the Inbox Exists
Whatever address you use, ensure it can receive replies. Guests often respond to confirmation emails with questions.
If the inbox doesn’t exist, those replies bounce. That looks unprofessional.
Setting Up a SendGrid Sender
Section titled “Setting Up a SendGrid Sender”If your team hasn’t configured SendGrid yet, you’ll need to set that up before confirmation emails can send.
Check Existing Senders
Go to Team Settings > Sending Accounts. If you see SendGrid accounts listed, you’re ready.
Select one as the sender for your confirmation emails.
Need to Add SendGrid?
Contact your admin or review the Sender Settings page.
SendGrid requires DNS configuration on your domain. Once configured, you can create any sending address using your domain.
Editing Your Confirmation Emails
Section titled “Editing Your Confirmation Emails”Navigate to RSVP tool » Email Settings. Click on any of the four tabs to edit that email.
Basic Editing
Click into the email body. Edit like any document. Auto-saves as you work.
The template applies to all future registrations for this event.
Removing Attachments
Click the X next to any attachment to remove it.
The calendar invite is just another attachment. Remove it if you don’t want it auto-delivered. Useful for multi-event registration scenarios where child events should send their own.
Disabling Confirmation Emails
Toggle off any email you don’t want to send.
Common: disable the decline email if you don’t want to send anything when guests say no. Disable the acceptance confirmation if child events should send their own. (Only available if the event has “Child events” enabled).
Testing Your Emails
Register as a guest using a test email address. Go through the actual flow to see what guests receive.
The email preview in the editor doesn’t show mail merge values filled in.
Create a test contact with an email you control. Register through your landing page. Check what arrives. This catches formatting issues and merge field problems.
Attachments and Special Content
Section titled “Attachments and Special Content”Confirmation emails support attachments and auto-generated content. Most of this lives on the acceptance confirmation.
Calendar Invite
Attached by default. The .ics file that puts your event on guests’ calendars.
Remove by clicking the X next to the attachment. Reattach via the three-dots menu » Add Calendar Invite.
QR Code
Auto-generated unique QR code for check-in. Enable via three-dots menu » Add QR Code.
Guests show this at the door. You scan with the iOS app to mark attendance.
PDF Attachments
Attach any file via the paperclip icon.
Common uses: parking instructions, pre-read documents, venue maps. Works for all confirmation email types.
The Acceptance Confirmation
Section titled “The Acceptance Confirmation”You send the invitation campaign. Guest clicks the link to register. And, now they need the calendar invite.
The acceptance confirmation handles this. It fires automatically when registration completes. The calendar invite is already attached.
Invitations go before commitment. Confirmations go after. Attach the calendar to the commitment.
Why Not Attach to the Invitation Campaign?
Attaching a calendar invite to an invitation feels like calendar spamming. Guests haven’t committed yet.
The acceptance confirmation respects the sequence: invite, commit, then calendar.
The Default RSVP Link Inclusion
Every acceptance confirmation includes the guest’s unique RSVP link.
Guests can return to update their registration, change their response, or cancel. They self-serve.
Waitlisted Guests Don't Get the Calendar
By design.
If your event is capacity-limited or requires vetting, waitlisted guests receive the waitlist email. No calendar. No QR code.
Only when you move them to Accepted do they get the acceptance confirmation with attachments.
Note: you can override this.
Waitlist and Approval Workflows
Section titled “Waitlist and Approval Workflows”Some registrations aren’t automatic yeses. The waitlist email confirms receipt without confirming attendance. The calendar invite stays on hold until you move a guest to Accepted, at which point the acceptance confirmation fires automatically.
The Vetting Queue Pattern
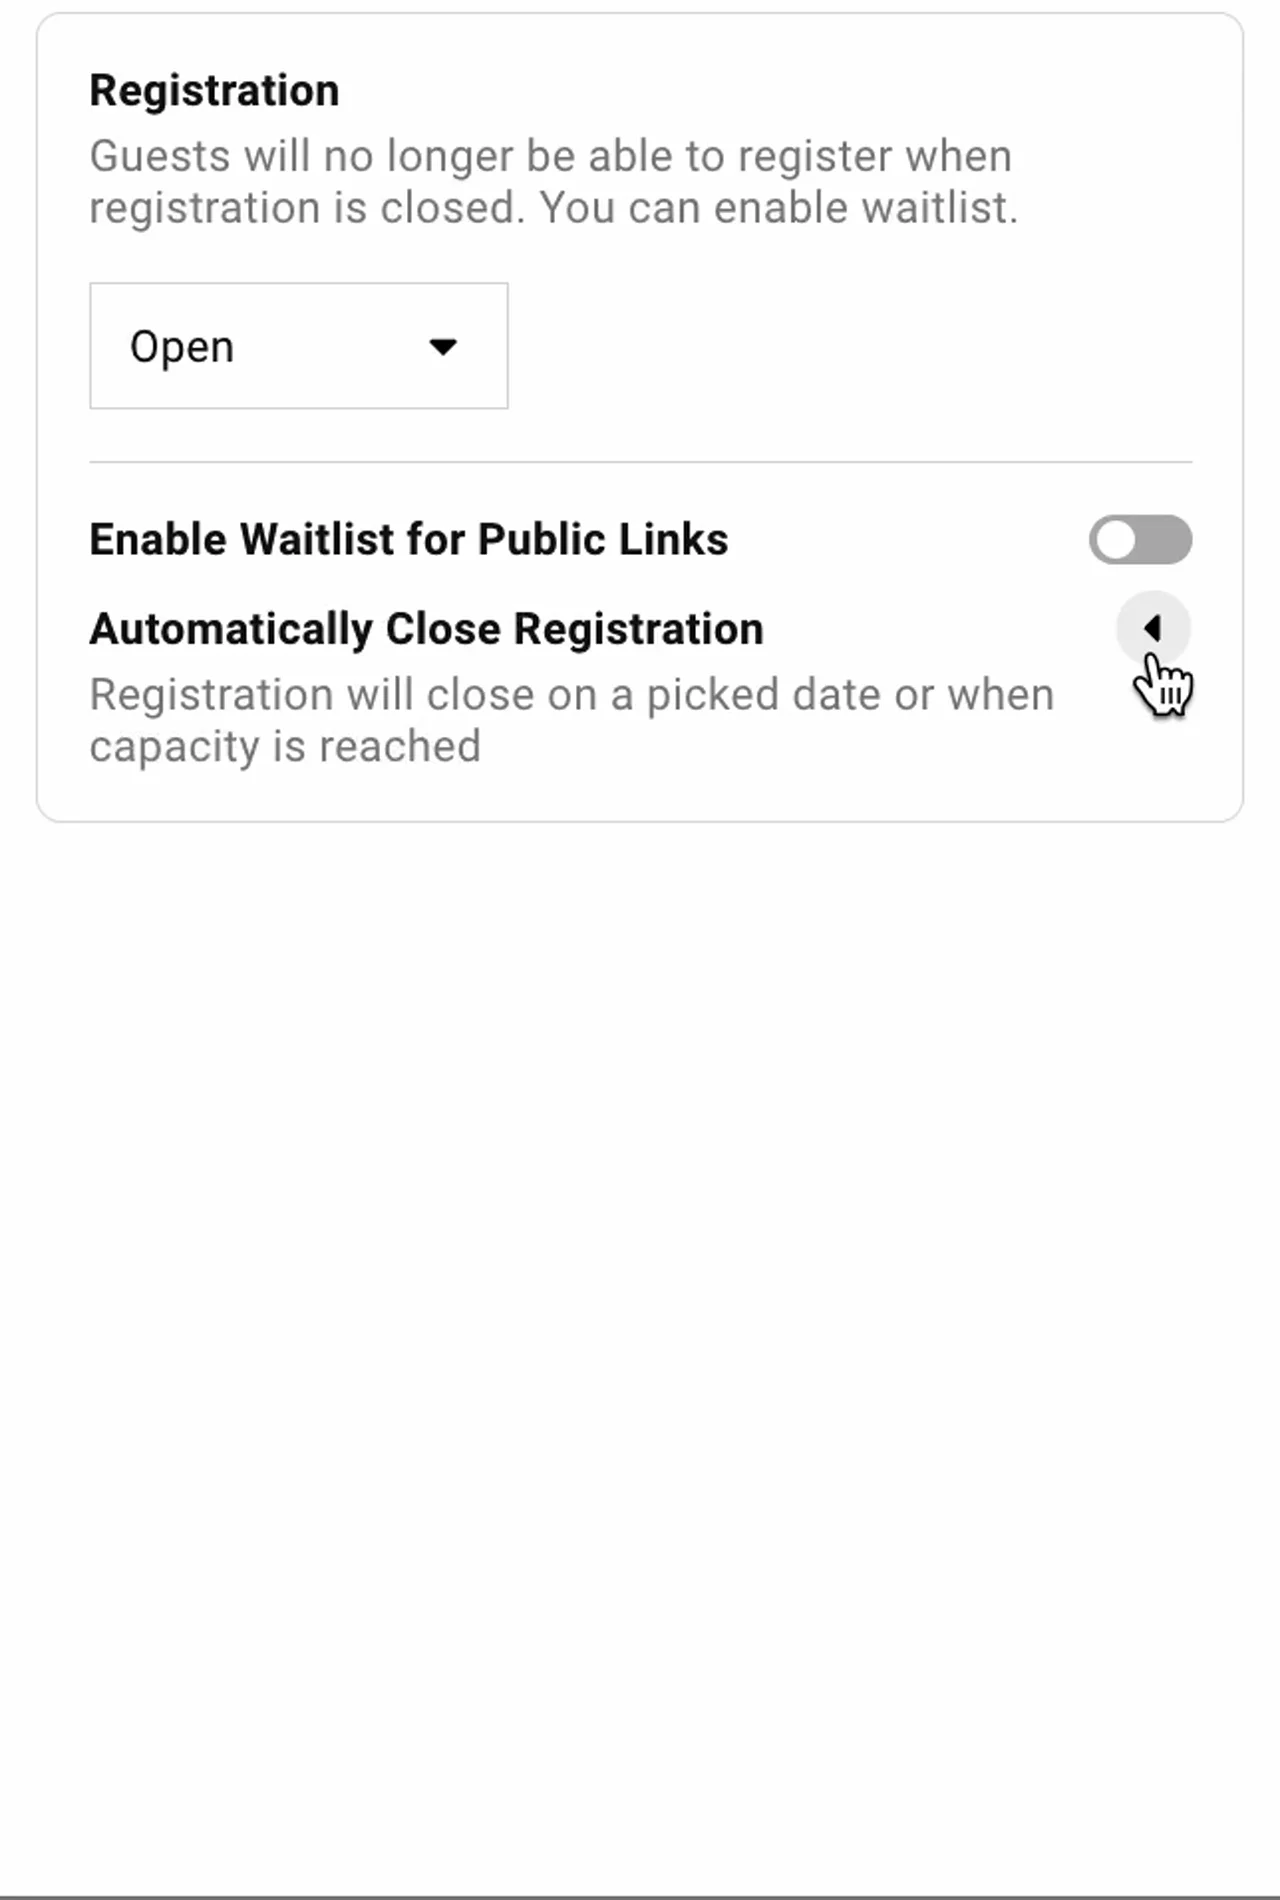
Set registration mode to Waitlist. Every guest lands on the waitlist.
Review at your pace. Move approved guests to Accepted. They get the acceptance confirmation automatically. See Capacity and Waitlists for registration mode settings and capacity configuration.
Public Link with Waitlist
Open registration through a public link with waitlist enabled. New registrations go to the waitlist. You control who gets confirmed.
Customize the Waitlist Email Language
The default reads something like “If a spot opens up, you’ll be notified.” If you’re using waitlist as a vetting step, that’s the wrong message.
Change it: “Your registration is received. We’ll confirm your spot shortly.” Match the language to your actual workflow.
Multi-Event and Advanced Scenarios
Section titled “Multi-Event and Advanced Scenarios”Multi-day events and parent-child structures sometimes need different confirmation behavior. Most of this comes down to knowing which event should own calendar delivery.
Multi-Day Events with Child Events
Guest registers through the parent event and selects sessions (child events). Remove the calendar invite from the parent’s acceptance confirmation. Each child event sends its own email with its own calendar invite.
Disabling the Acceptance Confirmation Entirely
Toggle off in Email Settings. Useful when the parent event handles communication and child events manage calendar delivery and capacity tracking.
Disabling the Decline Email
Common. Toggle off if you don’t want to send anything when guests decline. Their response is still recorded.
Survey Update Email for Cancellations
When guests return to cancel, they receive the survey update email. Customize it to acknowledge the cancellation gracefully.
Common Questions
Section titled “Common Questions” Why do confirmation emails require SendGrid?
Google and Microsoft accounts require periodic re-authentication. If this happens during your event, confirmation emails stop sending.
SendGrid accounts stay connected permanently, ensuring guests always receive their confirmations.
Can I send confirmation emails from a personal-looking address?
Yes. Create a SendGrid sender with a personal display name and email (marcus@yourfirm.com).
Make sure that inbox exists to receive replies.
How do I test confirmation emails?
Add yourself as a guest. Go through the registration flow. You’ll receive the actual confirmation email.
The preview in the editor doesn’t show mail merge values populated.
What mail merge fields work in confirmation emails?
Event name and guest name fields. Custom field data is not available in confirmation emails.
Custom field merge works in campaigns, not automated confirmations.
Can I send the calendar invite without the acceptance confirmation?
Not directly. The calendar invite attaches to the acceptance confirmation.
If you want to send calendar updates later, use the calendar update feature. See Calendar Invites for details.
What happens if a guest registers multiple times?
Duplicate registrations update the existing guest record.
They receive a survey update email confirming their information changed, not a new acceptance confirmation.
Do guests receive emails when I manually change their status?
No. Confirmation emails only fire when guests take action through the registration page.
If you manually move someone from Waitlist to Accepted, send them a campaign to notify them.
Can I resend a confirmation email?
Manually set the guest as “Accepted” on the guest list again. Select the option to send a confirmation email.